How to Organize Your Gmail Inbox Using Labels (And Never Miss an Important Email Again!)
I remember the day I hit my breaking point with our business inbox. 😩
Emails from customer service, sales inquiries, and follow-ups were pouring in faster than we could open them.
We try really hard to keep up with our inbox, but right now, it’s just Mel and I managing all the customer inquiries (which multiply by 50 during launches), sales notifications, bundle and summit reminders, invoices, the lovely replies we get from our weekly newsletters—plus a million other emails! (Phew, I got overwhelmed just writing this 😮💨😅😆)
But because of that, important messages sometimes slip through the cracks, and we end up scrambling to respond to customers who’ve been waiting for days.
I felt like we were constantly putting out fires, sending way too many “Sorry just saw this” replies and started dreading opening our business Gmail (business owners, can you relate??)
Enter the magic of creating Gmail labels.
By setting up Gmail labels and filters, we was able to not only clear our inbox and ensure we never missed an important email again, but by using labels, we were able to create an automated sales log systems using Google Sheets.
Now, our business daily sales are automatically logged into a spreadsheet (without any extra software!) 🤩
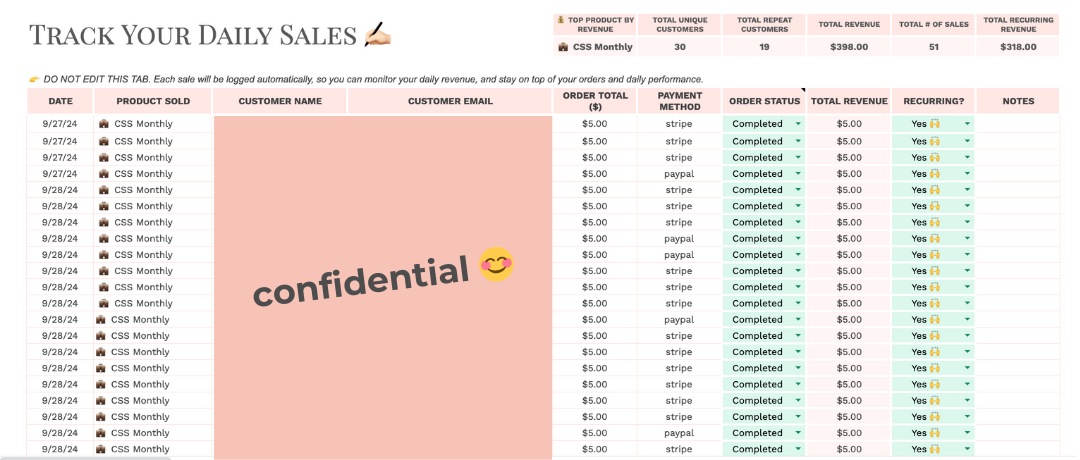
This allows us to track:
- Sales Volume: We can see the number of sales made each day, helping us identify peak sales periods.
- Top-Selling Products: The spreadsheet highlights which products are selling the most, so we know where to focus our marketing efforts.
- Customer Information: We track customer names and emails, making it easy to follow up, offer support, or send personalized thank-you notes.
- Payment Methods: By tracking payment methods (e.g., Stripe, PayPal), we can see which options our customers prefer.
- Order Status: We monitor whether orders are completed, pending, or refunded, ensuring every sale is processed correctly.
- Recurring Revenue: The “Recurring” column allows us to track which sales are from subscription-based products, helping us project our monthly revenue.
- Total Revenue: The dashboard calculates daily and total revenue, giving us a clear picture of our business performance.
- Notes: Any additional information or special requests from customers are documented in the “Notes” section, keeping everything in one place.
From there, we also track sales by day per each product, so we can easily spot which days had strong sales, which products performed best, and get a clear view of whether our marketing efforts are paying off.

This automated sales tracker gives us a bird’s-eye view of our sales performance, making it easy to stay on top of daily operations and make data-driven decisions!
And that’s just scratching the surface!
Our next big automated system will be a Customer Service Dashboard, where we plan on eventually giving our VA access to our inbox so she can label important customers emails as they come in, categorizing them using our labels system and from there those emails get automatically added to a spreadsheet.
This will be our own free “support ticket system” and will allow us to track:
- Customer inquiries and the types of questions being asked, helping us identify common issues or areas where we can improve.
- Refund and exchange requests to ensure we handle them promptly and maintain a clear record of resolutions.
- Support ticket statuses so we can monitor which requests are pending, in progress, or resolved, ensuring no customer gets overlooked.
- Product feedback or feature suggestions to spot trends and gather insights for future updates.
- Escalated issues that need immediate attention, making sure our team addresses urgent matters without delay.
More on this soon, and as always, we will test these systems for a few months, but if you are a VIP Spreadsheet Hub™ member, you will get these systems too!
Sorry I got a little overly excited about these systems 😆. People pay HUNDREDS of dollars for softwares that do exactly the same thing and Google tools allow us to do it for ZERO dollars.. but my point is, you see how you can streamline every aspect of your business with nothing but Gmail and Google Sheets? 🤯 It all begins with setting up an effective label system.
If you want to learn how to create an automated system for your business, you can check out this blog post: How to Export Emails from Gmail to Google Sheets Using Apps Script
Now, let me show you how to organize your Gmail inbox using labels, so you can take back control too!
Why Gmail Labels Are a Game-Changer
👉 Multiple Categories: Unlike folders, Gmail labels let you categorize emails in multiple ways. One email can be tagged as both “Customer Support” and “Urgent,” making it easier to track.
👉 Automated Organization: By setting up filters, you can automate the labeling process, so emails land exactly where they need to be, saving you time and reducing stress.
👉 Visual Cues: You can color-code or add emojis to your labels, making it quick and easy to spot important emails, even in a crowded inbox.
Here’s a glimpse of how we organized our sales emails (parent label + sub labels):
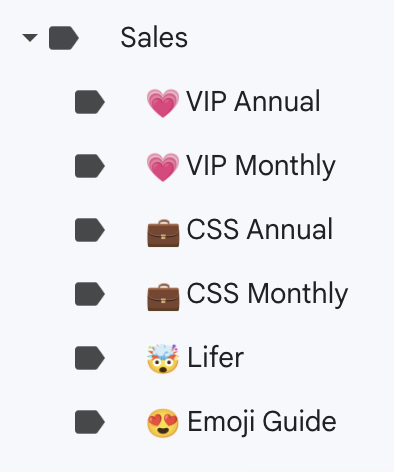
P.S. This doesn’t include all our products just yet, as we’ve only recently started organizing them, and we’re currently focusing on our main offers.
Our goal is to eventually have our entire product suite labeled properly, so everything gets filtered into our spreadsheet, giving us a clear, bird’s-eye view of our entire business!
Now, let’s jump into the step-by-step guide on setting up and using Gmail labels!
Step 1: How to Create Gmail Labels for Better Email Management
1️⃣ Creating Your First Label
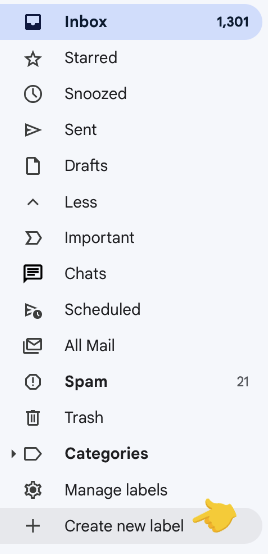
- Open Gmail and go to your inbox.
- Scroll down the left sidebar until you see “More.” Click on it, and then click “Create new label.”
- Enter a name for your label, such as “Customer Support,” “Sales Inquiries,” or “Urgent Follow-up.”
- Creating Parent Labels: If you want to create a parent label (a main category) with sub-labels underneath it, check the box that says “Nest label under,” and choose the parent label you want. For example, you can have a parent label called “Customer Emails” with sub-labels like “Inquiries,” “Support,” and “Follow-up.”
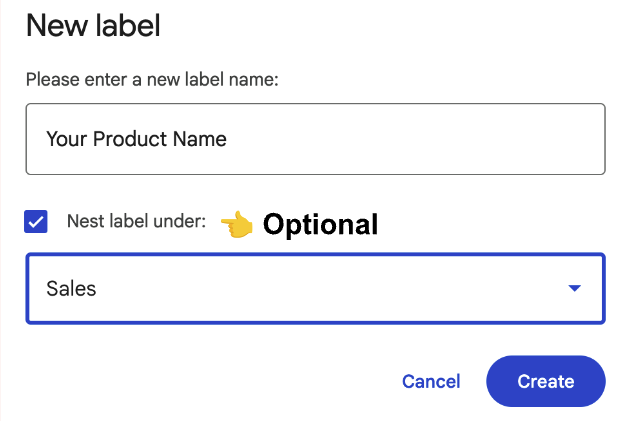
- Click “Create.” Repeat this process for each category and subcategory you need.
Pro Tip: Choose clear, specific names that match your needs, such as “Order Issues” or “Payment Follow-up,” and consider using parent labels to keep everything organized by category.
This makes it easier to spot important emails at a glance.
2️⃣ Organizing Your Emails with Labels
- Open an email you want to organize.
- Click the label icon (it looks like a tag 🏷️) at the top of the email.
- Check the boxes next to the labels you want to apply, including any parent or sub-labels, then hit “Apply.”
👉 Using Parent Labels: If you’ve set up parent labels, applying the parent label will automatically help categorize the email under all related sub-labels, making organization even easier!
👉 Bulk Labeling: Select multiple emails by clicking the checkboxes next to them, then apply the label or parent label in one go to save time.
Step 2: How to Set Up Filters to Automate Gmail Labeling
Use filters to take the automations up a notch! Here’s how to:
1️⃣ Creating Filters to Automatically Organize Emails
- Go to Gmail’s search bar (where it says Search Mail) and click the filter icon (to the right of the search bar).
- Start creating your filter criteria:
- You can enter the sender’s email in the “From” field to label emails from a specific person.
- You can use keywords in the “Has the words” field for emails containing specific phrases (e.g., “invoice” or “refund”), etc.
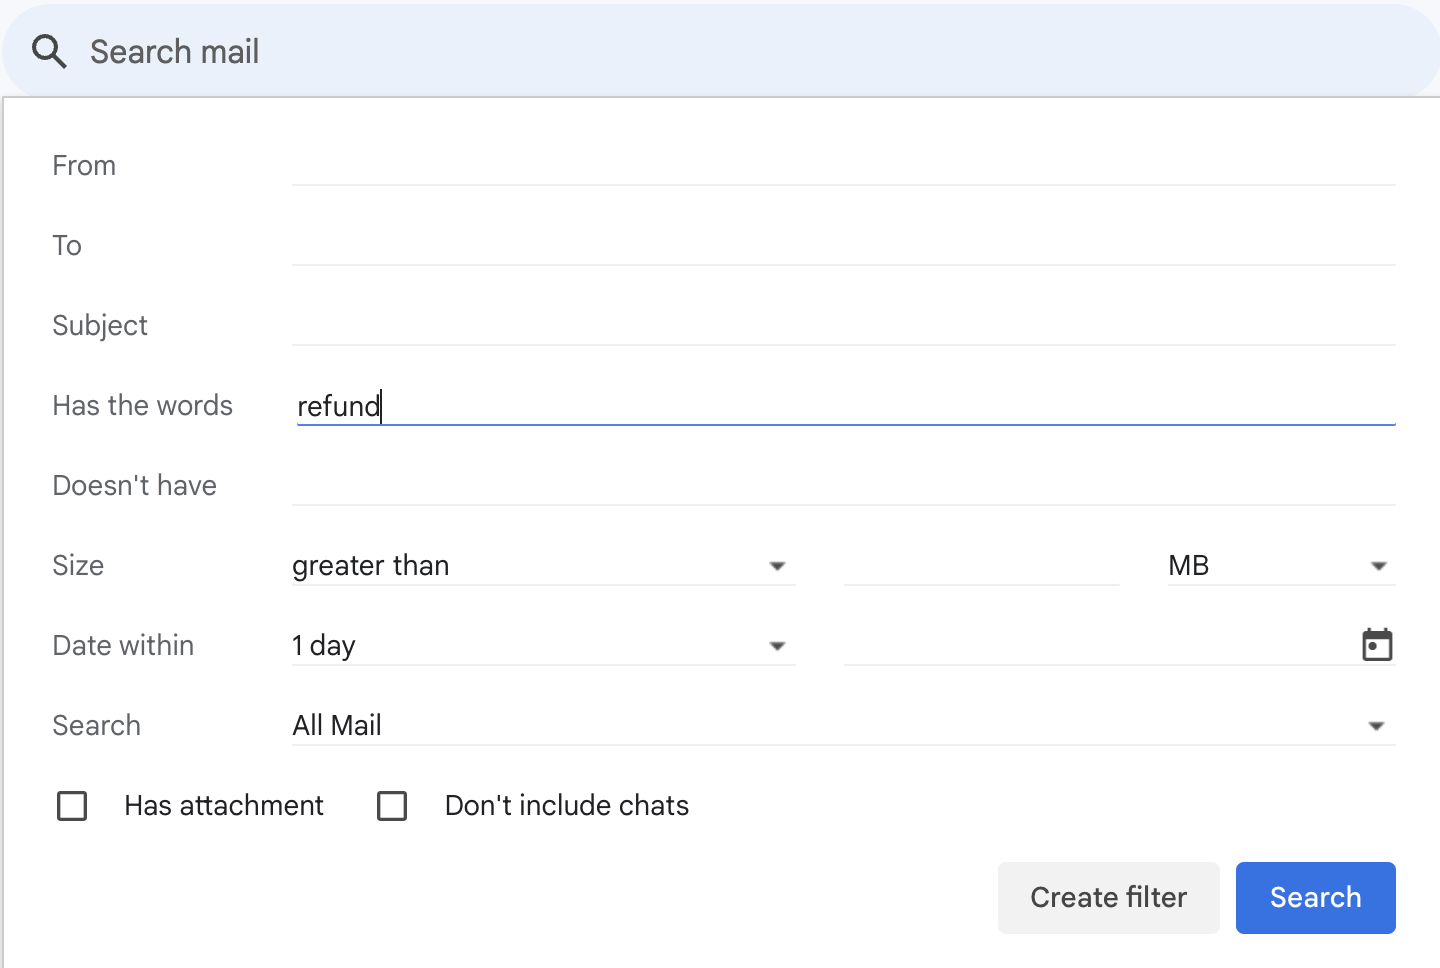
- Click “Create filter.”
- Check the box next to “Apply the label” and choose the appropriate label. If you want deeper insights on Gmail filters you can check out this blog post: How to Use Gmail Filters to Automatically Organize Emails and Improve Inbox Management.
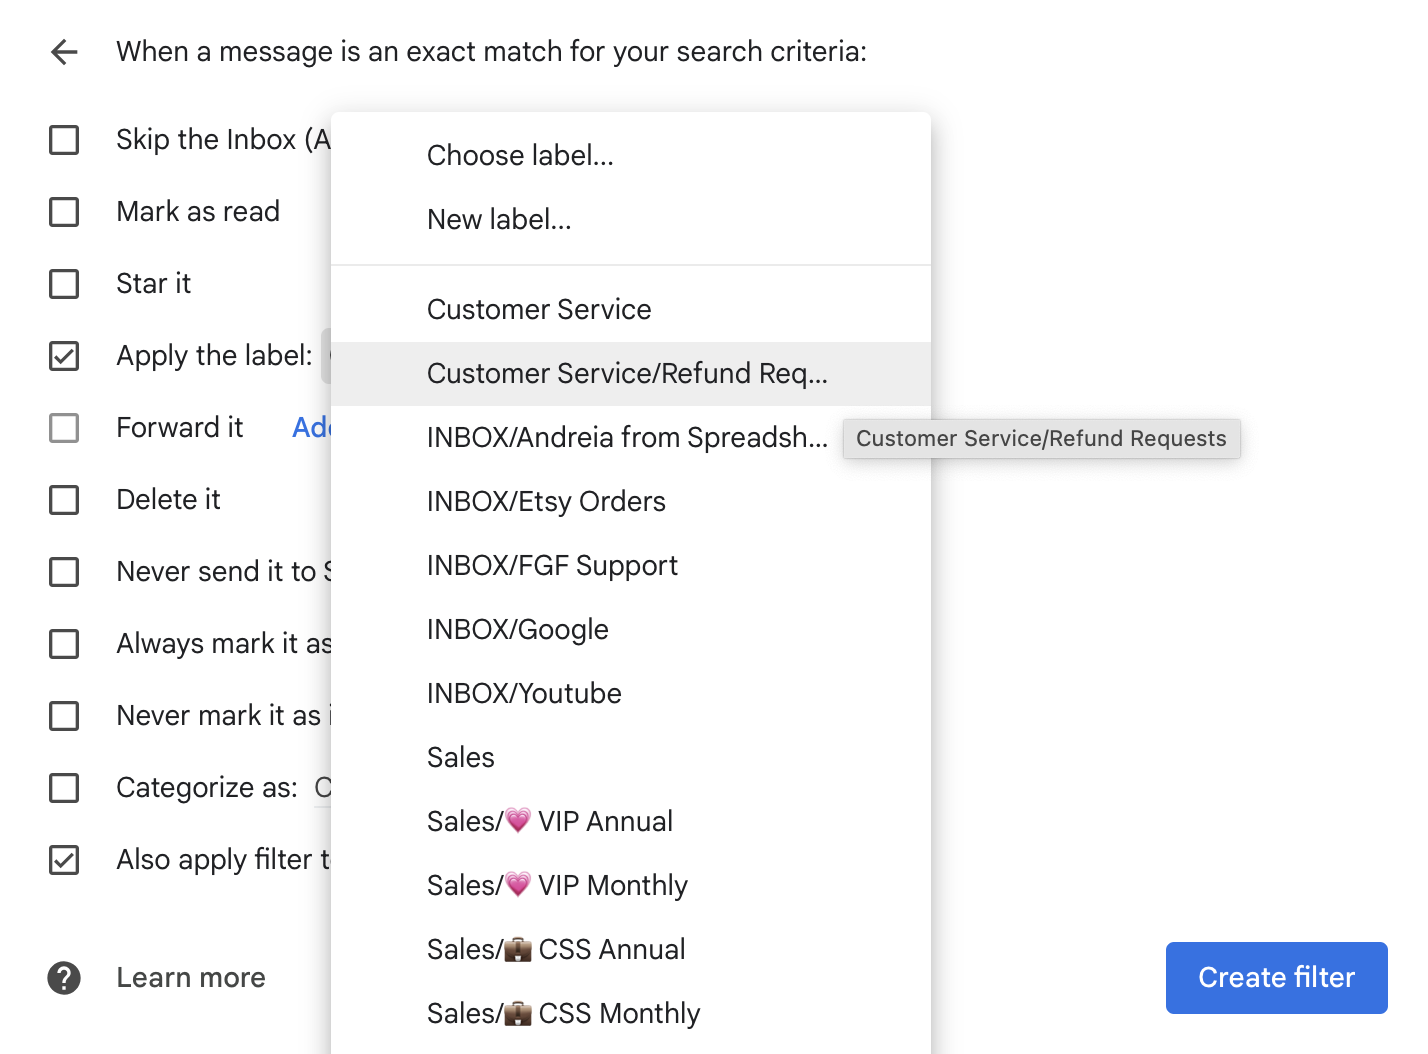
- Hit “Create filter” again.
Now, every time you receive an email that matches your criteria, it’ll be labeled and organized without you lifting a finger! 🎉
Step 3: How to Use Emojis or Color-Coding for Better Email Organization
1️⃣ Adding Color to Your Gmail Labels
- Hover over a label in the left sidebar until you see the three vertical dots (⋮).
- Click it, then select “Label color.”
- Choose your color or click “Add custom color” to personalize it further.
Pro Tip: Use bright, bold colors for urgent emails (e.g., red for “Urgent” and green for “Customer Service”) to make them stand out.
2️⃣ Using Emojis to Identify Labels
- While creating or editing a label name, add an emoji by right clicking to bring up the emoji keyboard or by copying and pasting an emoji from another source.
- For example, use 🔴 for urgent matters or 🛒 for sales inquiries.
This visual cue makes it super easy to identify the type of email at a glance! Do you want to learn more about how to use emojis as your best ally in digital organization? Check out our Emoji Guide To Organization!
Common Mistakes to Avoid When Using Gmail Labels
- Over-Labeling Your Emails: Don’t go overboard with too many labels. This can lead to more confusion instead of organization. Stick to 5-10 essential labels.
- Ignoring Automation: If you don’t set up filters, you’ll still spend too much time manually sorting emails. Automation is your best friend here! [link to post How to Use Gmail Filters to Automatically Organize Emails and Improve Inbox Management]
- Not Reviewing Your Labels Regularly: As your business grows, your needs may change. Regularly review and update your labels to make sure they’re still serving you.
- Skipping the Color-Coding: Color-coding is a game-changer! If you don’t use it, you’re missing out on the visual benefits that make finding emails faster and easier.
Organizing your Gmail inbox using labels doesn’t have to be complicated. With just a few tweaks and some color-coded magic, you’ll turn your inbox from a stressful mess into a streamlined, organized system.
So, are you ready to take back control of your inbox and never miss another important customer email again? 🚀 Follow these steps, set up your Gmail labels today, and watch your email stress melt away!
When you’re done, come join our Facebook Group Community and let us know how your inbox transformation is going. Share your wins, tips, or any challenges you faced – we’d love to hear your story and celebrate your progress! 🎉